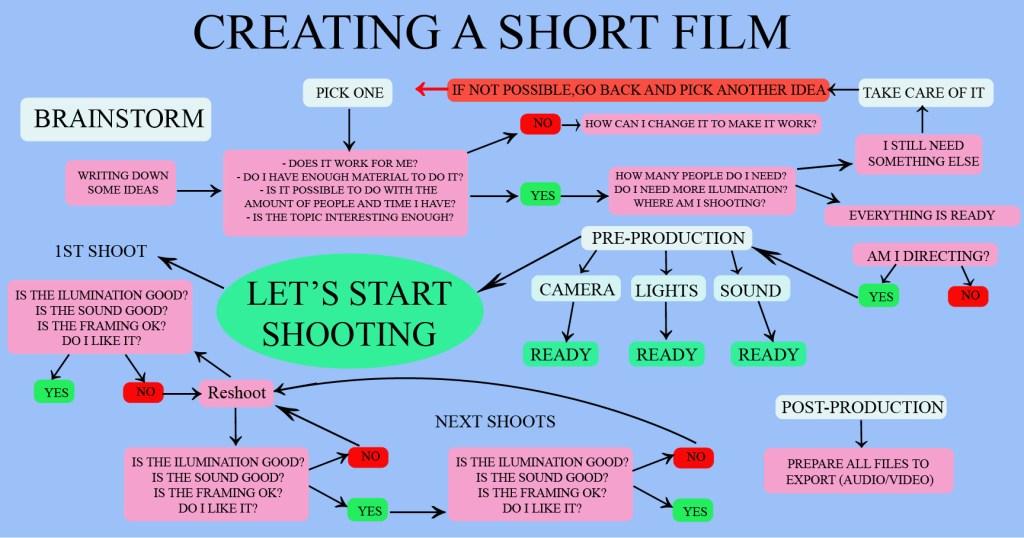
WORKFLOW
In this first project of the class we had basically to take a project that we have prevoiusly done and then wirte and describe the process and how we created it, all the ideas, process, and challenges.
Materials
This was completely created on Illustrator. I did not use any other external materials besides the video I was using as base idea.
Process and Challenges
The first thing I had to do was get an idea of a topic that the video would deal with, it had to be an interesting topic. At the beginning it was very difficult, since I was going to be the one who would be acting and directing, and editing everything. as I was recording I was modifying parts of the plot and adding details. One of the biggest problems I had was the lighting, since my house which was the place I was filming has small windows and the natural lighting is quite bad. Not having enough equipment, I had to manage and use flashlights and whatever I had avaliable to illuminate enough.
Completing this short film took much longer than I thought, since it took me more than three weeks to complete. After I finished recording everything I needed, I started with the edition and since I didn’t have much knowledge on the subject and I didn’t have the necessary equipment, it took me a lot of time to do it.
Final Result
CAPTURE
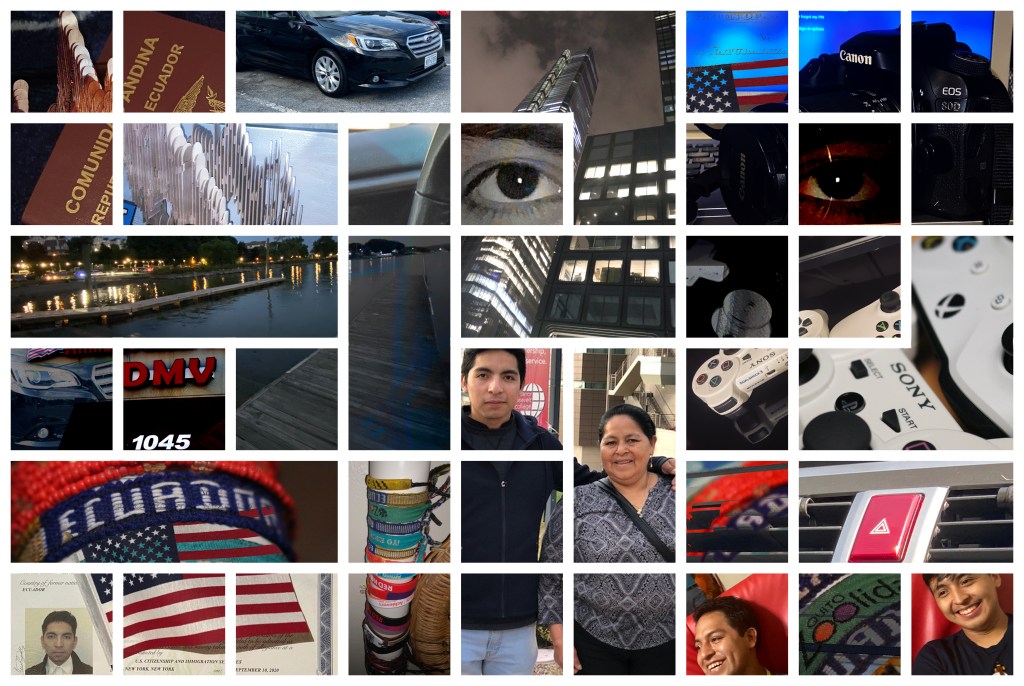
this project I organized in Bridge selfies (serious, funny, with others, sad, locations, etc) to create a “creative” contact sheet or design a GRID system. i was not sure what to do, but after some research and finding some inspiration, I finally decided to create a kind of collage using a grid.
Materials
In this artwork I used my own pictures (recent and old) that would represent differents parts of mi life in general, It could be images of projects that i have done, places that i have visited, items that are meaningful to me, etc.
This projects was done using only photoshop
Process and Challenges
The first thing that I had to do was create a grid and give it a color, this could be either horizontal or vertical. after creating the grid, it was time to start adding the images.
I did a vertical version first, but it seems that I did something wrong at the beggining of it because I could not get to each layer, so I had to start all over again. Howwever, it was a good thing because I chaged it to a horizontal version and I liked it much more than the first one.
I overlapped the images and started to get some interesting combinations.
I tried to create more unity between the images by deleting some of the lines of the grid. This created variety in the design and makes it look a lot more interesting. At the end I just added some blending modes to some strong parts of the design such as the eyes
Final Result
Found Images
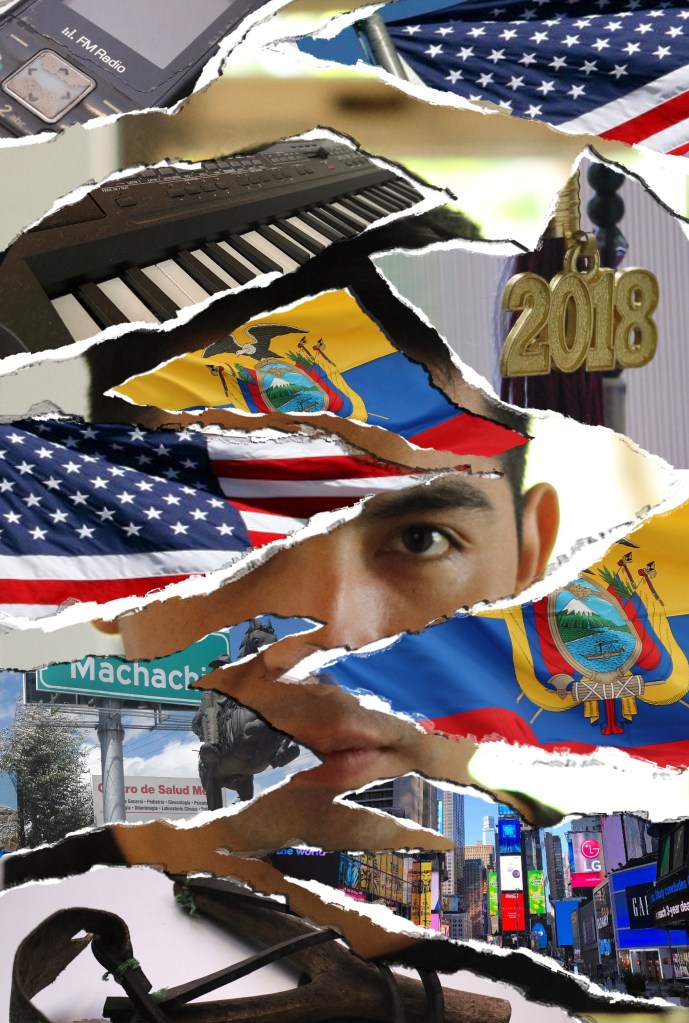
From the photos I had taken in the last week or two, I had to identify any found things or objects that are three dimensional that you have encountered, discovered or have meaning with a narrative that you will explain it’s importance. For this project, it was difficult to have an idea / topic but thanks to some suggestions I chose this idea to do it about obtaining my citizenship. For this I added photos on top of my self-portrait in organic shapes that somehow look like torn paper or paper that is ripping to reveal what’s under my skin.
Materials
once I had chosen my theme, I had to look for photos that represent these ideas of citizenship and important things or that represent my life in both countries (Ecuador and the United States) for this added things like objects from my grandparents, important or representative places of each country. I also add some objects that show goals that I have completed. and of course a self portrait looking directly into the camera.
Process and Challenges
To start, I chose a self-portrait that looked neutral, to reinforce the idea that even after having obtained my citizenship here in the USA, I have no preference for one country over the other.
I had to create a new brush using an image of torn paper (I had no idea how to do this, so it was really difficult but after a few videos, tutorials, and class critiques, i found my way through) and with that I deleted several pieces of the self-portrait where I would later add images referring to both Ecuador and the United States. I started by adding flags of each country and left one of my eyes uncovered because I was thinking of adding a hole in paper in that part, but I couldn’t create a brush for that so I discarded the idea (for now).
After all the images have been added to each of the previously designated parts, add more detail to the edges of the torn pieces of paper, such as shadow and white edge details to make it look a bit more realisticand three dimensional.
And so after several final adjustments this is the final product.
Final Result
Data Visualization
In this project I created an artwork that represents a normal week in my life. for this I compiled some photos and videos of important things of my week. In this project I highlighted things like my job, college, free time, creativity, and some other things.
Materials
In this project I used a self portrait that then using Illustrator transformed into vector shapes to create my avatar. This project was done using both Photoshop and Illustrator.
Process and Challenges
After choosing the portrait that I was going to use, I edited it to have only the part that was needed to use. After that using Photoshop I transformed the photo to vector shapes and changed the color of the shapes to give it a more natural color. Also I edited / deleted some details of it like shadows and some other detail in the hair.
To create the poster, I also created icons that represent each of the activities that it would show in it. I did the icons and the rest of the poster using Illustrator. All the icons were created one by one using lines, shapes and colors. I made a type of wave that surrounded my portrait to give fluidity to the activities of the week. I placed each of the icons on the wave within circles, but after some revisions, I decided to change the size of the circles for each of the activities and thus use size as a sign of importance, the bigger the circle, the more important the activity.
I think that of the whole process of creating this poster, the most difficult thing was to choose the background color, so that the icons, the avatar and the wave are easy to see. At the end I think it came out pretty good, but still I do not feel like it is completed, I feel like I have some stuff to work on and add to it.
Final Result

Motion Graphics
This project was based on the previous Data visualization project. In this one had to create a video using photoshop and the icons that I had previously created for the previous project. The goal was to create a video using the idea of representing a week of your life. For this I had enough freedom of what I could include in the video, and I decided to include short clips of myself expressing my creativity, I also added other artworks from other classes like designs and photographs.
Materials
This video was made using various softwares. I used Photoshop, Illustrator, and Premiere
Process and Challenges
I started making a timeline sketch of what more or less I wanted to put in my video, from there I added all my assets to a document in photoshop and I started creating keyframes and adding effects, movement and sound to the video.
In the process I had to edit some of the artworks that I used, since they worked well as a still image but they didn’t work to give it animation and movement. After everything was ready I added music and I really think I should have added music at the beginning, since I was trying to make the transitions and animations of the images go with the rhythm of the music, and because I added the music at the end I had to rearrange lots of things to coordinate with the sound.
I had a lot of setbacks during the process of this video since my laptop was not working the way I would like, since it had a little lag every time I added an animation or some effect to the video and had to render the video in order to see how it really looks. After so much it came out pretty much as I wanted but I have not been able to revise it after the class critique. I still have some edits to do to make it better.
Final Result
